
Did you know that nearly 70% of online shoppers abandon their cart before completing a purchase? According to Baymard Institute research, one of the top reasons is a complicated or irrelevant checkout process. For WooCommerce store owners, this presents a golden opportunity to turn the tide. When you personalize WooCommerce checkout fields, you can make the checkout experience simple, relevant, and branded - removing unnecessary friction and boosting conversion rates.
When you tailor your checkout form, you create a page that matches your brand’s tone, streamlines the customer journey, and collects only the information you truly need - nothing more, nothing less. This isn’t just about visual appeal; it’s about improving usability, building trust, and driving more completed sales.
In this guide, we’ll explore why personalized checkout fields matter, what you can customize, and how to make changes with or without coding. Plus, we’ll highlight a recommended WooCommerce plugin to make the process easier and more powerful.

Why Personalizing WooCommerce Checkout Fields Matters
1. Improves User Experience
A generic checkout form might ask for information your customers don’t want to give - or simply don’t need to give. For example, asking for a company name in a consumer-focused store can confuse buyers. By tailoring the checkout fields to match your business type, you guide customers smoothly through the process, reducing abandonment rates.
2. Builds Brand Consistency
Your checkout page should feel like a natural extension of your store. Matching the tone, style, and field labels to your brand voice reinforces trust. Whether it’s adding custom messages, branded placeholders, or removing unnecessary form steps, each tweak strengthens brand identity.
3. Collects the Right Data
When you personalize WooCommerce checkout fields, you control exactly what data you collect. For example:
- For a clothing store: add a “Preferred Fit” dropdown.
- For a bakery: add a “Delivery Date & Time” selector.
- For a subscription service: include a “Gift Message” field.
Relevant fields ensure better fulfillment and fewer follow-up emails.
What You Can Customize in WooCommerce Checkout
By default, WooCommerce checkout includes standard fields like First Name, Last Name, Company, Address, Phone, Email, and Order Notes. While these are functional, they may not fully align with your store’s unique requirements. The good news is - you can personalize WooCommerce checkout fields to make the buying experience faster, more relevant, and more on-brand.
Here are some powerful ways to customize:
- Add New Fields: Include extra options such as gift messages, special delivery instructions, loyalty program IDs, or marketing consent checkboxes to gather essential information.
- Remove Unnecessary Fields: Streamline the form by removing irrelevant inputs. For example, skip the “Company” field if you only sell directly to consumers.
- Rearrange Field Order: Place the most critical fields at the top so customers can complete their purchase more quickly.
- Change Field Labels & Placeholders: Swap generic wording for branded, user-friendly terms that match your store’s tone.
- Make Fields Conditional: Use smart logic to show fields only when they’re needed. For instance, display a “VAT Number” field only if a customer selects a Business option.
- Change Field Types: Switch between text boxes, dropdown menus, date pickers, checkboxes, or radio buttons for a more interactive and intuitive experience.
These tweaks may seem small, but collectively they can reduce checkout friction, improve conversions, and strengthen brand trust.
How to Personalize WooCommerce Checkout Fields Without Coding
If you’re not comfortable with code, the WooCommerce Checkout Add-Ons plugin is the easiest and most reliable method.
Recommended Plugin: WooCommerce Checkout Add-Ons
This official WooCommerce extension lets you:
- Add custom fields to checkout (text, dropdowns, checkboxes, date pickers).
- Apply conditional logic to show fields only when relevant.
- Assign additional costs for certain selections.
- Capture extra customer information for better order processing.
Benefits of Using This Plugin:
- No coding required.
- Fully compatible with WooCommerce updates.
- Supports multiple field types for better flexibility.
- Easy integration with your existing checkout design.
Step-by-Step: Personalizing WooCommerce Checkout Fields with a Plugin
If you’ve chosen the WooCommerce Checkout Add-Ons plugin, customizing your checkout fields is straightforward. Follow these steps to create a branded, conversion-focused checkout experience - without touching a single line of code.
Step 1: Install & Activate the Plugin
-
Purchase WooCommerce Checkout Add-Ons from the official WooCommerce marketplace.
-
Download the plugin’s .zip file from your WooCommerce account.
-
In your WordPress dashboard, go to Plugins → Add New → Upload Plugin.

-
Upload the ZIP file and click Install Now.
-
Once installed, click Activate to start using the plugin.
Pro Tip: Always back up your site before installing new plugins to ensure you can roll back changes if needed.
Step 2: Access Checkout Field Settings
-
Navigate to WooCommerce → Checkout Add-Ons in your WordPress admin panel.
-
Click Add New Field to begin customizing your checkout form.

Step 3: Choose the Field Type & Add a Label
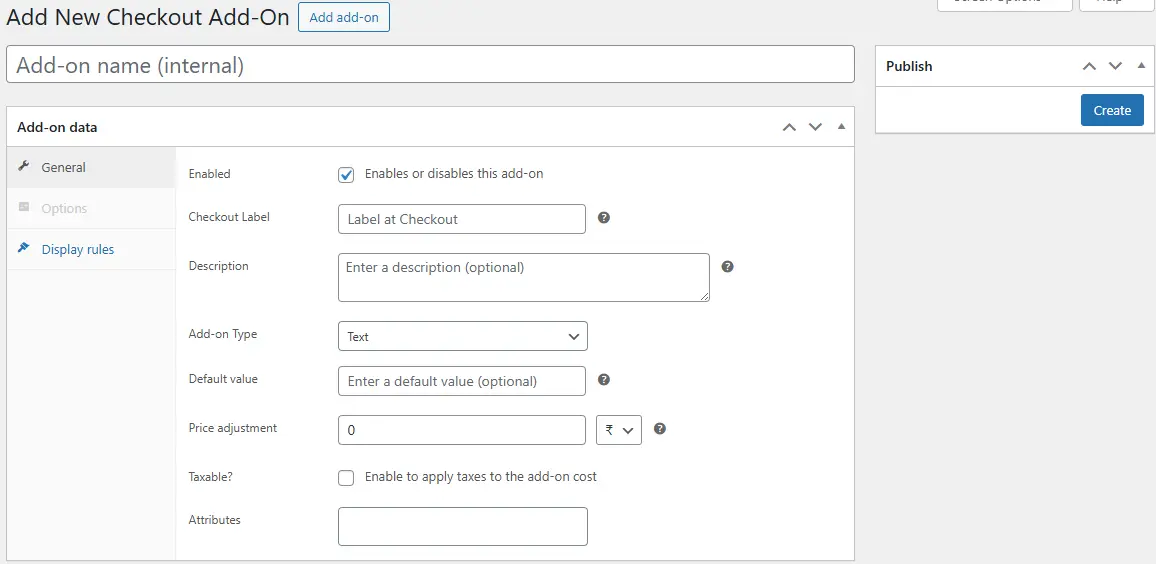
-
Select your desired field type:
-
Text box
-
Dropdown menu
-
Radio buttons
-
Checkboxes
-
Date picker
-
-
Add a clear, descriptive label that tells customers exactly what information you need.
-
Optionally, include a placeholder text to guide them on what to enter.
Example: For a bakery, you could add a “Preferred Pickup Time” date picker field with a placeholder like “Select your pickup date.”
Step 4: Set Field Conditions (Optional)
-
Enable conditional logic to show or hide the field based on customer selections.
-
Example: Display a “Gift Message” text box only if the customer selects Yes for “Is this a gift?”
-
This keeps the checkout clean and relevant for each buyer.
Step 5: Save & Test Your Changes
-
Click Save Field to apply your customization.
-
Perform a test checkout to ensure:
-
The new field appears in the right place.
-
Conditional logic works as expected.
-
Data from the new field is saved correctly in the order details.
-
Pro Tip: Test on both desktop and mobile devices to ensure the field is easy to use for all customers.
How to Personalize WooCommerce Checkout Fields with Code
For developers or store owners comfortable with PHP, WooCommerce provides filters like woocommerce_checkout_fields.
Example: Adding a Custom Text Field
Example: Removing the Company Field
Example: Reordering Fields
add_filter( 'woocommerce_checkout_fields', 'reorder_checkout_fields' );
function reorder_checkout_fields( $fields ) {
    $fields['billing']['billing_phone']['priority'] = 15;
    return $fields;
}
Best Practices for Checkout Field Personalization
1. Keep It Simple: Every additional field can slow down checkout. Only ask for information you truly need.
2. Use Clear Labels: Avoid jargon. Make sure field labels are easily understood by your target audience.
3. Test on Mobile Devices: Over 55% of e-commerce traffic comes from mobile users. Ensure your personalized checkout works seamlessly on smaller screens.
4. Use Conditional Logic Wisely: Only show fields when relevant to avoid overwhelming customers.
5. Align with Legal Requirements: If you collect personal information, comply with GDPR, CCPA, or other regional data privacy laws.
How Personalized Checkout Fields Improve Conversions
A well-optimized checkout page can dramatically impact your store’s bottom line. According to Formisimo’s research, reducing form fields from 11 to just 4 can increase conversion rates by as much as 160%. This highlights a critical truth: every extra, irrelevant, or confusing field is a potential point of abandonment.
When you personalize WooCommerce checkout fields, you:
- Remove Irrelevant Questions - Customers only see fields that matter to their order, eliminating friction and frustration.
- Make Checkout Feel Faster - A shorter, cleaner form creates the perception of speed, encouraging customers to move through the process without hesitation.
- Reduce Cognitive Load - By using clear labels, logical field order, and relevant inputs, you make decisions easier for buyers.
Personalization also builds trust and connection. When customers see a checkout page that feels tailored to them - whether it’s through branded language, relevant options, or a clean layout - they’re more likely to complete their purchase and less likely to abandon their cart.

Creating a Checkout That Converts
A smooth, relevant, and branded checkout experience can be the difference between a completed sale and an abandoned cart. When you personalize WooCommerce checkout fields, you not only make the process easier for your customers but also collect the right information to fulfill orders efficiently.
Whether you choose a no-code solution like the WooCommerce Checkout Add-Ons plugin or a custom-coded approach, the goal is the same - to remove unnecessary friction, keep only relevant fields, and ensure the checkout feels like a natural extension of your store.
By applying thoughtful personalization, you can reduce cart abandonment, improve conversions, and strengthen customer trust - all while delivering a checkout process that reflects your brand’s personality and values. In short, a better checkout equals a better business.
Interesting Reads:
How to Customize WooCommerce Checkout Fields to Boost Conversions