
When running an online store, shipping costs can make or break your profit margins. A study by Retail Systems Research found that 86% of shoppers abandon their cart if shipping costs are higher than expected. This is especially true for bulky or irregularly sized items where weight alone doesn’t accurately represent the shipping expense. If you sell products like furniture, sports gear, or large packages, you need a way to calculate shipping based on size - not just weight.
That’s where learning how to Assign Shipping by Dimensions in WooCommerce becomes crucial. By setting shipping rules for length, width, and height, you can ensure accurate delivery charges, prevent revenue loss, and create a fair system for your customers. In this guide, we’ll walk you through the process, explore the right tools (like the WooCommerce Table Rate Shipping plugin), and show you practical tips for improving shipping accuracy in your store.

Why Shipping by Dimensions Matters in WooCommerce
Shipping costs are often calculated using dimensional weight - a pricing technique that considers the package’s volume in addition to its actual weight. Carriers like FedEx, UPS, and DHL all use this method to avoid undercharging for large but lightweight parcels.
If you only calculate shipping by weight in WooCommerce, you risk two problems:
- Undercharging customers: For example, shipping a large, lightweight lampshade might cost $40 due to its volume, but weight-based rules may only charge $15.
- Overcharging customers: If you apply flat-rate shipping without considering size, smaller orders might get overcharged, which can increase cart abandonment.
By setting up shipping by product dimensions, you align your WooCommerce store’s shipping costs with real-world carrier pricing. This improves transparency, prevents profit loss, and enhances the customer experience.
Understanding Dimensional Shipping in WooCommerce
Before setting up rules, it’s essential to understand what dimensional shipping means in the context of WooCommerce. Unlike standard weight-based calculations, dimensional shipping determines delivery costs using the cubic volume of a package.
Formula for Cubic Volume:
Cubic Volume = Length × Width × Height
Shipping carriers often convert this volume into a dimensional weight using a divisor known as the DIM factor (commonly 5000 for cubic centimeters or 139 for cubic inches).
Example Calculation: If a product box measures 50 × 40 × 30 cm:
Even if the actual weight is only 4 kg, the shipping charge will be based on 12 kg because of the space it occupies.
By configuring WooCommerce to incorporate dimensional weight rules, you can ensure your store charges the correct shipping amount every time - protecting your profit margins and avoiding undercharges for bulky, lightweight products.
What You Need to Assign Shipping by Dimensions in WooCommerce
By default, WooCommerce only supports weight-based shipping calculations. This means that if you want to set up dimension-based shipping rules - taking into account a product’s length, width, height, or total volume - you’ll need an additional tool.
The most dependable solution is the WooCommerce Table Rate Shipping plugin.
Why choose WooCommerce Table Rate Shipping?
- Flexible shipping conditions - Create rules based on length, width, height, or total cubic volume, giving you precise control over costs.
- Combined weight + dimension pricing - Ensure accuracy for both large, lightweight products and small, heavy items.
- Tiered shipping rates - Set different pricing levels depending on size ranges, perfect for oversized or irregular packages.
- Conditional shipping rules - Apply specific rates for certain products, categories, or destinations, allowing for tailored shipping strategies.
With this plugin, you can fully customize your WooCommerce shipping setup to match real-world carrier pricing, ensuring both cost accuracy and a better customer experience.
Step-by-Step: How to Assign Shipping by Dimensions in WooCommerce
Now that you know why size-based shipping is important, let’s walk through exactly how to set it up using the WooCommerce Table Rate Shipping plugin.
1. Install and Activate the WooCommerce Table Rate Shipping Plugin
- Visit WooCommerce.com and purchase the Table Rate Shipping plugin.
- Download the plugin’s
.zipfile to your computer. - In your WordPress dashboard, go to Plugins → Add New → Upload Plugin.
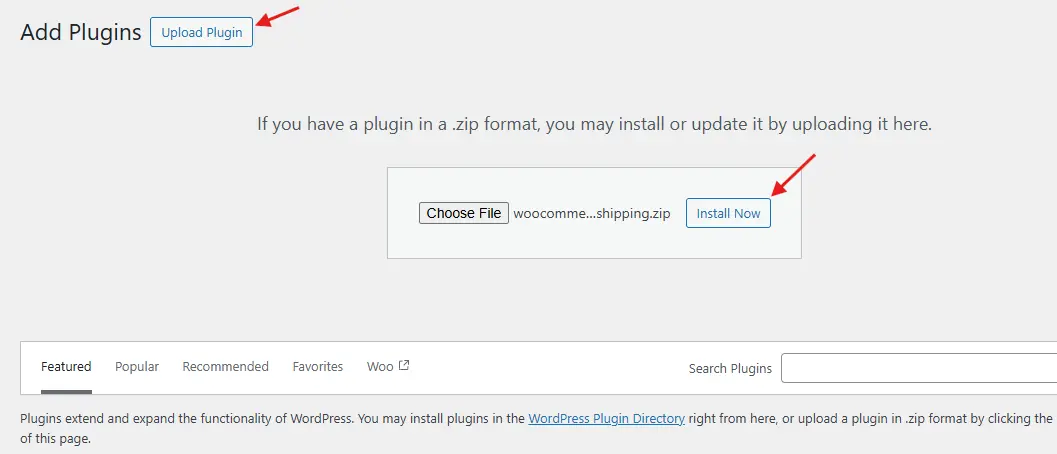
- Upload the
.zipfile, click Install Now, and then activate the plugin.
Once activated, you’ll notice new configuration options under your WooCommerce Shipping Zones settings.
2. Set Up Your Shipping Zone
Shipping zones allow you to apply specific rules to certain regions or countries.
- Navigate to WooCommerce → Settings → Shipping → Shipping Zones.
- Click Add Shipping Zone.
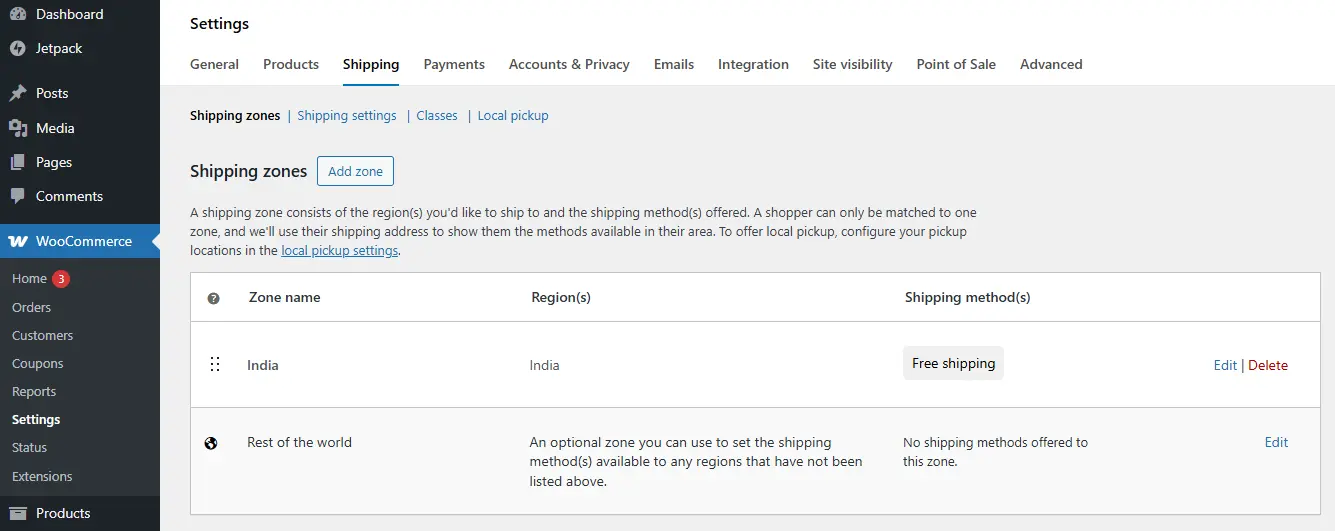
- Name your zone (e.g., US - East Coast) and choose the applicable locations.
- Click Save Changes.
3. Add a Table Rate Shipping Method
- Inside your chosen shipping zone, click Add Shipping Method.

- Select Table Rate Shipping from the dropdown menu.

- Click Add Shipping Method, then Edit to start customizing your rates.
Here you’ll access the plugin’s advanced shipping rule configuration panel.
4. Create Shipping Rules Based on Dimensions

The Table Rate Shipping plugin lets you define rates using length, width, height, or total volume.
Example setup:
- Rule 1: For products smaller than 30 × 30 × 30 cm, charge $10.
- Rule 2: For products between 31 × 60 × 60 cm, charge $20.
- Rule 3: For products over 60 cm in any dimension, charge $40.
You can also:
- Set minimum and maximum dimensions for each rate.
- Add tiered pricing for oversized products.
- Combine weight and volume conditions for even greater accuracy.
5. Test Your Shipping Rules Before Going Live
Accurate testing ensures your store charges customers correctly.
- Create test products in WooCommerce with different dimensions.
- Add them to your cart and go through checkout.
- Verify that the displayed shipping rates match your intended setup.
- Adjust your rules if you find that you are undercharging or overcharging.
Pro tip: Test with both small and large products to ensure your rules work across all scenarios.
With these steps, your WooCommerce store will accurately calculate shipping by product dimensions, aligning your pricing with real carrier rates and enhancing customer trust.
Best Practices for Shipping by Dimensions in WooCommerce
Setting up dimension-based shipping in WooCommerce can be highly accurate, but it requires careful configuration to avoid mistakes. Follow these best practices to ensure your store’s shipping rates remain fair, competitive, and profitable.
1. Always Enter Accurate Product Dimensions
Navigate to Products → Edit Product → Shipping and enter the length, width, height, and weight for each product. These values are the foundation for accurate shipping calculations.
- Use consistent units - stick to either centimeters or inches across all products.
- Double-check your measurements to prevent incorrect shipping charges.
2. Use Real Packaging Dimensions
When calculating dimensions, measure the final packaged product, not just the product itself.
- Account for extra space taken up by padding, bubble wrap, or protective inserts.
- This ensures shipping rates match what carriers will charge you.
3. Combine Weight and Dimension Rules
Relying on dimensions alone can misprice shipping for unusual products.
- Small but heavy items (like metal tools) may need higher rates than their size suggests.
- Large but lightweight items (like lampshades) might cost more due to space, even if they weigh little.
Combining both weight and volume rules prevents these pricing errors.
4. Offer Free Shipping Thresholds
Encourage customers to spend more by offering free shipping when they reach a certain order value.
- Set your minimum spend so that it still covers your average packaging and shipping costs.
- Promote this threshold on product and cart pages to boost conversions.
5. Keep Your Rates Competitive
Regularly compare your shipping costs with:
- Major carriers like FedEx, UPS, and DHL.
- Competitors are selling similar products.
Staying competitive ensures you don’t lose customers over high delivery fees.
Common Mistakes to Avoid
One of the biggest pitfalls when setting up shipping by dimensions in WooCommerce is neglecting to enter accurate product measurements. Missing or incorrect dimensions prevent your rules from working properly, leading to undercharging or overcharging customers. Another common issue is mixing measurement units (e.g., entering some products in inches and others in centimeters), which can cause unpredictable rate calculations.
It’s also important to avoid overcomplicating your shipping rules. While detailed conditions can improve accuracy, too many overlapping rules can make your setup hard to manage and troubleshoot. Always test multiple product scenarios before going live to catch errors early and ensure customers see correct rates at checkout.

Smarter Shipping with WooCommerce
Learning how to assign shipping by dimensions in WooCommerce is more than just a technical tweak - it’s a strategic move that protects your profit margins, ensures pricing accuracy, and improves the customer experience. With dimensional weight becoming the industry standard for carriers like FedEx, UPS, and DHL, aligning your store’s shipping rules with real-world practices is essential.
By using the WooCommerce Table Rate Shipping plugin, you gain the flexibility to set precise rules based on product size, volume, and weight. This means no more undercharging for oversized items or overcharging for small packages. Paired with accurate product data, thoughtful testing, and competitive rate checks, your shipping setup can become a key driver of customer satisfaction and business growth.
In ecommerce, the right shipping strategy isn’t just about delivering a product - it’s about delivering trust, transparency, and value with every order.
Interesting Reads:
How to Add and Manage Brands in WooCommerce
How to Add Delivery Date Selection in WooCommerce (Step-by-Step)