The checkout process is the final and most critical step in any online shopping journey. However, according to Baymard Institute, the average cart abandonment rate is a staggering 69.99%—and a complicated or cluttered checkout is one of the top reasons shoppers leave without completing their purchase. By taking the time to customize WooCommerce checkout fields, you can create a smooth, intuitive, and conversion-focused experience that keeps customers moving toward payment instead of bouncing away.
To maximize conversions, tailor your checkout page to gather only the most essential information. This approach reduces friction, builds trust, and makes it easier for shoppers to confidently click the “Place Order” button.
In this guide, you’ll discover why optimizing checkout fields is essential for sales, how to adapt them to your store’s needs, and how tools like WooCommerce Checkout Field Editor allow you to make these changes quickly—without touching a single line of code.

Why Customizing WooCommerce Checkout Fields Matters
The checkout page is where your customer decides whether to complete the purchase or walk away. Every extra step, irrelevant field, or poorly designed form can increase friction and lower your conversion rate.
When you customize WooCommerce checkout fields, you ensure that the page collects only essential information. For example, if you sell digital products, you don’t need a shipping address—removing that field can speed up checkout and improve completion rates.
Beyond reducing friction, customization also helps you:
- Match branding – A consistent style builds trust and keeps users engaged.
- Collect relevant data – Gather customer details that benefit your business, such as gift messages or custom order notes.
- Enhance mobile experience – Mobile users are less patient with long forms, so optimizing for smaller screens is critical.
A fine-tuned checkout process leads to happier customers and more completed sales.
Understanding WooCommerce Checkout Fields
WooCommerce checkout fields are grouped into three main sections, each with its purpose in completing an order:
1. Billing Fields
These collect essential payment and contact details such as name, billing address, email, and phone number. Accurate billing data ensures smooth payment processing and helps prevent fraud.
2. Shipping Fields
If products are shipped, this section gathers delivery information—name, address, and contact details for tracking updates. For stores selling digital goods or offering pickup, this section can be removed to speed up checkout.
3. Additional Fields
This area typically includes optional fields like “Order Notes” for special requests or delivery instructions. Many store owners also add custom fields here, such as gift messages or preferred delivery dates.
While WooCommerce offers limited built-in customization, tasks like adding new fields, removing unnecessary ones, or reordering them require either custom coding or a plugin like WooCommerce Checkout Field Editor. Customizing these fields helps reduce friction, streamline the checkout process, and improve conversions.
Common Reasons to Customize WooCommerce Checkout Fields
Customizing checkout fields isn’t just about aesthetics—it’s about functionality, efficiency, and personalization. Here are the most common scenarios:
1. Remove Unnecessary Fields: Asking for too much information slows customers down. If you don’t ship physical products, why keep the “Shipping Address” section?
2. Add Relevant Fields: For example, a clothing store could add a “Gift Message” field, or a photographer could add an “Event Date” field.
3. Rearrange Field Order: If the phone number is more important than the company name for your orders, move it higher in the form.
4. Change Field Labels & Placeholders: Clear instructions reduce errors. For example, instead of “Postcode,” use “Zip Code (5 digits).”
5. Make Fields Optional or Required: Ensure you only make necessary fields mandatory—forcing customers to fill out irrelevant ones can cause frustration.
Choosing the Right Tool for Checkout Customization
While you can customize WooCommerce checkout fields with PHP code, it’s not ideal for non-developers. Instead, using a dedicated plugin is faster, safer, and more flexible.
We recommend the WooCommerce Checkout Field Editor plugin. It allows you to:
- Add new fields (text, dropdown, checkbox, date picker, etc.)
- Remove or disable existing fields
- Reorder fields via drag-and-drop
- Edit field labels, placeholders, and default values
- Set conditional logic (show/hide fields based on selections)
This plugin integrates seamlessly with WooCommerce and requires no coding skills.
How to Customize WooCommerce Checkout Fields (Step-by-Step)
Customizing your WooCommerce checkout fields doesn’t have to be complicated. By using the WooCommerce Checkout Field Editor plugin, you can make adjustments in just a few clicks. Follow this step-by-step guide to tailor your checkout process for better usability and higher conversions.
Step 1: Install and Activate the Plugin
-
Purchase and download the WooCommerce Checkout Field Editor plugin from WooCommerce.com.
-
In your WordPress dashboard, navigate to Plugins > Add New > Upload Plugin.
-
Click Choose File, select the ZIP file you downloaded, and click Install Now.

-
Once installed, click Activate Plugin.
Tip: Always back up your site before installing a new plugin to prevent any compatibility issues.
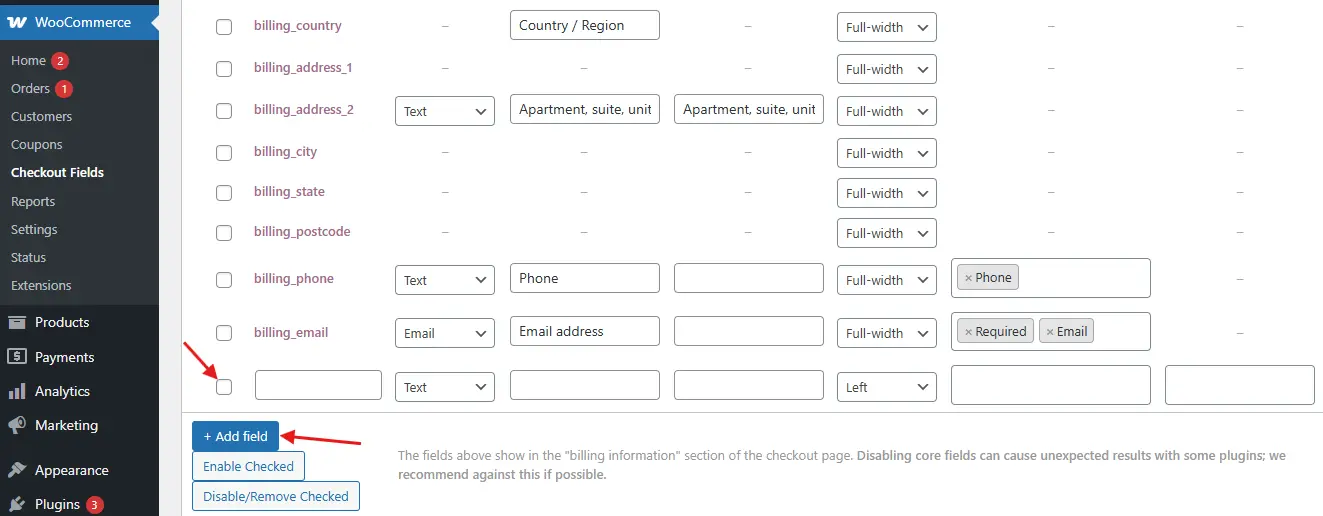
Step 2: Access the Checkout Field Editor
After activation, go to WooCommerce > Checkout Form.

You’ll see three main tabs representing the checkout field groups:
-
Billing – Customer name, address, contact details, etc.
-
Shipping – Address details if shipping is different from billing.
-
Additional – Extra fields like order notes or special requests.
Step 3: Add a New Field
-
Choose the section where you want to add the new field (Billing, Shipping, or Additional).
-
Click Add Field.
-
Select your desired field type:
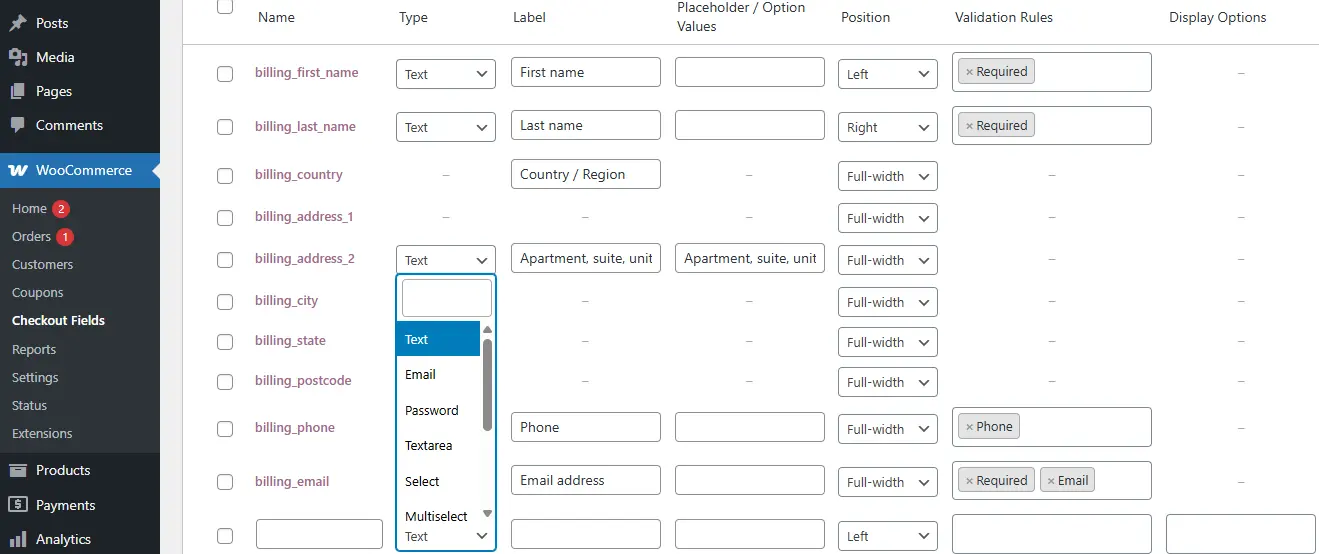
-
Text
-
Email
-
Number
-
Date Picker
-
Checkbox
-
Select/Dropdown
-
-
Configure the field:
-
Label – The visible name of the field.
-
Name/Key – The backend identifier.
-
Placeholder – Example text to guide customers.
-
Required – Decide whether it must be filled in before checkout.
-
-
Click Save Changes to apply.
Example: Running a gift shop? Add a “Gift Message” text area in the Additional section so customers can include personalized notes.
Step 4: Edit Existing Fields
-
Locate the field you want to change and click the Edit icon.
-
You can:
-
Change the label (e.g., change “Postcode” to “ZIP Code”).
-
Toggle required/optional status.
-
Add placeholder text for clarity.
-
Step 5: Remove Unnecessary Fields
If certain fields aren’t relevant to your store, disable them.
-
Disabling keeps them hidden from customers but lets you re-enable them later if needed.
-
Example: If you sell only digital products, you can disable shipping fields entirely.
Step 6: Rearrange Fields
Drag and drop fields to reorder them.
Pro Tip: Move “Email Address” to the top so you can quickly follow up on incomplete orders.
Step 7: Apply Conditional Logic (Optional)
Some versions of the plugin include conditional logic, allowing you to show or hide fields based on previous choices.
-
Example: If a customer selects “Gift Wrap,” reveal a “Gift Message” text area.
-
This keeps the form clean and only shows fields when they’re relevant, reducing friction during checkout.
Best Practices for Checkout Field Customization
While customizing your WooCommerce checkout fields can improve conversions, it’s important to strike the right balance between gathering essential data and keeping the process simple for your customers. Here are some best practices to guide you:
1. Keep It Minimal
Every extra field you add increases the time it takes for customers to complete their purchase. Studies show that long, complicated forms lead to higher cart abandonment rates. Ask yourself: Do I need this information to process the order? If not, remove it or make it optional.
Example: If you don’t require a customer’s company name for shipping, there’s no need to keep that field mandatory.
2. Use Clear, Familiar Labels
Avoid industry jargon or overly technical terms that might confuse customers. Field labels should be instantly recognizable and self-explanatory.
- Instead of “Postal Code,” use “ZIP Code” if that’s the common term for your audience.
- Add placeholder text for extra guidance, like “Enter your street address” or “MM/DD/YYYY” for dates.
3. Group Related Fields Logically
Organizing fields into logical sections improves the flow of your checkout form. Customers should move seamlessly from one type of information to the next.
- Billing details first, followed by shipping information, then payment options.
- If you add custom fields (e.g., gift messages), keep them near related options (e.g., gift wrap selection) to maintain context.
4. Optimize for Mobile Users
With mobile shopping continuing to rise, your checkout form must be fully responsive and easy to navigate on smaller screens.
- Use large, tappable form fields and buttons.
- Avoid making customers zoom in to enter information.
- Minimize typing by using dropdowns, checkboxes, and auto-fill where possible.
5. Test Thoroughly Before Going Live
Even small changes to checkout fields can cause technical glitches if not tested properly.
- Place multiple test orders using different devices, browsers, and payment methods.
- Check that your custom fields store and display the correct data in order confirmations, emails, and the admin dashboard.
- Ask a friend or colleague to go through the process—they might spot usability issues you missed.

Streamline Checkout, Increase Sales
Customizing WooCommerce checkout fields is more than just a design tweak—it’s a strategic move to remove friction, enhance the shopping experience, and ultimately boost conversions. By tailoring the checkout process to your customers’ needs, you can collect essential information, streamline form completion, and encourage more completed purchases.
With the WooCommerce Checkout Field Editor plugin, even non-developers can make powerful adjustments—adding, removing, and reordering fields with ease, while ensuring the form stays intuitive and mobile-friendly.
Remember, the key is balance: keep the checkout process as short and clear as possible while gathering the data you truly need. Test your changes, listen to customer feedback, and refine your approach over time.
The easier you make it for customers to complete their purchase, the more likely they’ll come back—turning one-time buyers into loyal, repeat shoppers.
Interesting Reads:
How to Let Customers Reorder Products Easily in WooCommerce