Brand influence plays a key role in buying decisions—and knowing how to add and manage brands in WooCommerce can help you capitalize on it. According to Nielsen, 59% of shoppers prefer new products from familiar brands, while 21% say they’ve switched stores based solely on brand availability. If your WooCommerce store doesn’t organize products by brand, you could be missing out on valuable conversions.
The good news? WooCommerce now includes native support for brands, meaning you no longer need third-party plugins to assign and showcase brand names. This built-in feature lets you create, manage, and display brand taxonomy with ease—improving product filtering and boosting shopper trust.
In this guide, you’ll learn how to add and manage brands in WooCommerce, use them effectively on product and archive pages, and enhance brand visibility for a smoother, more brand-focused shopping experience.

What Are WooCommerce Brands?
WooCommerce brands are a built-in taxonomy—just like product categories or tags—that let you associate products with well-known brand names. This feature helps improve product organization while enhancing search, filtering, and customer trust.
Unlike standard tags, brands carry marketing weight. Grouping products under familiar brand names allows shoppers to make quicker, more confident purchase decisions.
Since WooCommerce version 8.6, you can add and manage brands in WooCommerce without relying on third-party plugins. The feature is now part of the core, making it easier than ever to showcase branded products.
Why Use Brands in Your WooCommerce Store?
Using brands in WooCommerce offers both practical and strategic advantages:
1. Improved Navigation and Filtering
Customers can easily filter products by brand, especially if you’re selling items across multiple manufacturers or designers.
2. Boosted Customer Trust
Recognizable brand names offer a sense of quality and reliability. Displaying these builds confidence during the purchasing journey.
3. Better Product Discovery
Brand-based archives allow users to discover related products from the same brand—great for upselling and cross-selling.
4. SEO Benefits
Each brand archive page is indexable and can be optimized with unique meta descriptions and headings, enhancing your store’s search visibility.
How to Enable and Add Brands in WooCommerce
Starting with WooCommerce 8.6, brands are now integrated as a taxonomy, much like categories or attributes. Here’s how to get started:
Step 1: Update to WooCommerce 8.6 or Later
Before you begin, ensure you’re using WooCommerce 8.6 or above. If not, update your WooCommerce installation:
-
Go to Dashboard > Updates
-
Backup your site first using a tool like UpdraftPlus or your hosting provider
-
Update WooCommerce safely
Step 2: Locate the Brands Section
Once updated, you’ll find the brand’s taxonomy available in the WooCommerce admin area.
-
Go to Products > Brands
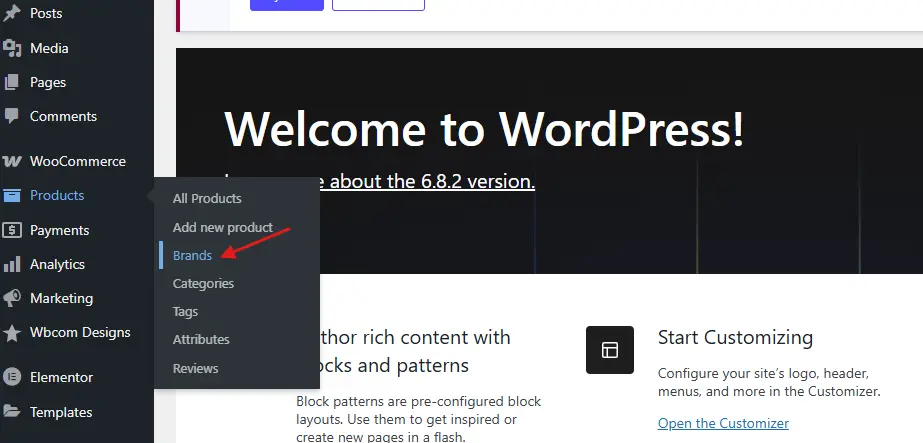
-
If you don’t see this option immediately, try navigating to Products > Add New, and under “Product data,” look for the Brands tab.
Step 3: Add a New Brand
Here’s how to add a brand:
-
Go to Products > Brands
-
Enter the brand name (e.g., Nike, Apple, Samsung)
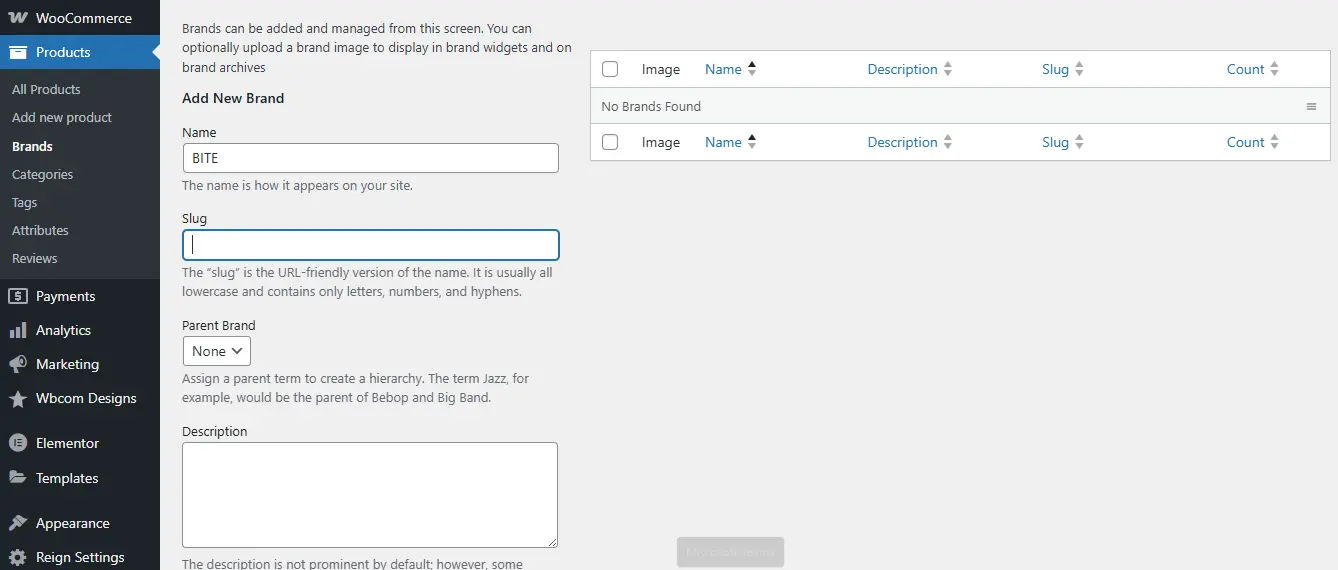
-
Optionally, add a description, image/logo, and a custom slug (useful for SEO)
-
Click Add New Brand
You can continue adding as many brands as needed. These will now be available as a selectable taxonomy across your products.
How to Assign Brands to Products
After setting up your brand list, it’s time to assign it to specific products.
Method 1: Single Product Edit
-
Go to Products > All Products
-
Click Edit on any product
-
In the Product data section, find the Brands box
-
Select one or more brands
-
Click Update
Method 2: Bulk Edit Products
For larger stores, this saves time:
-
Navigate to Products > All Products
-
Select multiple products using the checkbox
-
Click Bulk Actions > Edit > Apply
-
In the bulk edit screen, choose the brand under the “Brands” dropdown
-
Click Update
How to Display Brands on Product Pages
By default, WooCommerce may or may not display the brand name prominently. You may need to tweak your theme or use a filter to make it visible. Here’s how you can show brands effectively:
1. Check Theme Compatibility
Many modern WooCommerce themes now support brands out of the box. Themes like Reign and BuddyX are great examples—they’re fully compatible with WooCommerce’s native brand functionality and display brand filters, logos, and archives seamlessly. If your theme doesn’t support brands yet, consider switching or adding custom templates to get the most from this feature.
2. Add Brands Manually via Hooks
Use this code in your functions.php or a custom plugin:
3. Display on Archive Pages
Brand taxonomy also creates individual archive pages for each brand, much like categories. You can link to:
To make these pages more visually appealing, add brand descriptions and logos when creating each brand in the dashboard.
How to Create a Brand’s Menu or Filter
To help customers shop by brand, you can include brands in navigation or sidebar filters.
Option 1: Brands in Navigation Menu
-
Go to Appearance > Menus
-
Click Screen Options (top right) and check “Brands”
-
Add individual brands or a parent “Brands” menu item
-
Save your menu
Option 2: Sidebar Filter Using Widgets
-
Go to Appearance > Widgets
-
Add the Product Brands List or Filter by Brand widget (if available)
-
Configure title, display hierarchy, show counts, etc.
These filters are invaluable for larger catalogs.
Optimizing Brand Archive Pages for SEO
Brand archive pages give you an excellent opportunity for additional SEO optimization.
1. Write Custom Descriptions
Add a keyword-rich brand description using the WordPress brand editor. For example:
“Explore the full range of Nike shoes, apparel, and accessories. Designed for performance and style, Nike products are trusted by athletes worldwide.”
2. Customize Slugs
Instead of /product-brand/nikeYou can rename the base slug:
-
Go to Settings > Permalinks
-
Look for the “Product Brands base” and customize it (e.g.,
/brands/)
3. Use SEO Plugins
If you’re using Yoast SEO or Rank Math, you can:
-
Edit brand archive titles and meta descriptions
-
Add custom Open Graph images for each brand
-
Control indexing preferences (index/follow)
This can drive more organic traffic from brand-related searches.
How to Manage and Edit Brands Over Time
Brand management isn’t a set-it-and-forget-it task. As your store grows, consider these best practices:
1. Merge Duplicate Brands
If products were added with slightly different brand names (e.g., “Nike” vs “NIKE”), merge them:
-
Go to Products > Brands
-
Edit the incorrect one and change it to the correct name
-
WordPress will handle taxonomy reassignment
2. Delete Inactive Brands
Remove brands you no longer stock to keep your brand filter clean.
-
Go to Products > Brands
-
Click Delete on the brand
-
Reassign products if needed
3. Monitor Brand Performance
Track which brands get the most views, conversions, or returns using tools like:
-
Google Analytics 4 (via custom dimensions)
-
WooCommerce reports by brand (available through extensions)
-
Conversion data from your CRM or ERP
Pro Tips for Boosting Conversions with Brands
1. Feature Popular Brands on the Homepage: Highlight top-selling or premium brands to draw clicks. Use image banners or sliders that link to brand archives.
2. Add Brand Logos to Product Thumbnails: With minor theme edits or using CSS, you can display the brand logo on product grids for stronger visual branding.
3. Create Brand-Specific Landing Pages: If certain brands have multiple product lines, build custom landing pages using Gutenberg or a page builder. Optimize each for conversions.

Brands That Build Loyalty
Learning how to add and manage brands in WooCommerce isn’t just about backend organization—it’s about creating a shopping experience that mirrors how customers make decisions. When shoppers can filter by their favorite brands, browse related items, and trust product quality, their journey becomes smoother and faster.
Thanks to the built-in WooCommerce brands feature, you can now implement all of this—without plugins or complex workarounds. The result? Improved user experience, cleaner store management, and more brand-driven sales.
Now it’s your turn: explore your product catalog, define your key brand categories, and make them work for your customers and conversions alike.
Interesting Reads:
How to Schedule Posts Ahead and Stay Consistent Online with BuddyPress
10 Best WooCommerce Page Customization Plugins 2025
How to Add Delivery Date Selection in WooCommerce (Step-by-Step)